
SharePoint data sources
Enable secure, read-only access to SharePoint sites and lists.
This integration provides read-only access to SharePoint list data using a service account. It links a SharePoint list to a Create data source. The integration does not write back to SharePoint and works only with predefined sites and lists.
Permissions
The integration requires Application permissions. Application permissions are needed to:
- Enable automated data access through a service account.
- Ensure consistent access control without relying on user-based permissions.
- Restrict access to specific, manually configured sites and lists.
Security
The integration protects SharePoint from any unintended edits:
- Read-only access with no data modifications in SharePoint.
- Access limited to specific sites and lists, avoiding broad permissions.
- Controlled by Unit Admins, who manage site permissions.
Set up the integration
The SharePoint integration needs to be set up both in Azure and Create.
Set up integration in Azure
-
Register the App in Azure AD
- Navigate to Azure Portal → Azure Active Directory → App registrations → New registration.
- Enter a name for the app and select Register.
-
Grant API Permissions
- Go to API Permissions → Add a permission → Microsoft Graph → Application permissions.
- Select Sites.Selected (to allow access to specific SharePoint sites).
- Select Grant admin consent for [organization].
-
Generate a Client Secret
- Go to Certificates & Secrets → New client secret.
- Generate a secret and copy the value for use in the integration.
Set up integration in Create Admin
- Configure the Integration
- Navigate toIntegrations in the side panel on the left and selected New integration, pick the SharePointServerIntegration and enter the following details:
- Name - Name to be used in Create.
- Client ID – The unique ID of the registered app from Azure AD.
- Tenant ID – Your organization's Azure Tenant ID.
- Client Secret – The previously generated secret for authentication.
- Site Name – Manually specify the SharePoint site(s) to allow access.

- Define Site Access Settings
- Manually configure allowed sites – The integration will only access sites that are explicitly entered.
- Controlled by Unit Admins – Only unit admins can configure which sites the integration can access.
- Enforce Access Control
- Only unit admins can configure or modify site access settings.
- No other users, including standard admins, can view or change these configurations.
- Sites.Selected allows broad API access, but actual access is manually restricted to configured sites.
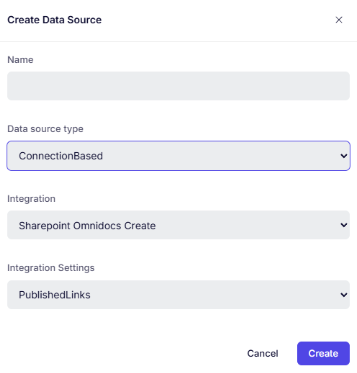
Create Data Source Configuration
- Navigate to Data Sources and create a New data source
- Name the data source
- Pick the type ConnectionBased
- Select the SharePoint integration created earlier.
- In the Integration Settings, choose the SharePoint list to use as the external data source.
- Click Create to finalize the setup.
- Configure the Form Component
- Go to Form Components in the side panel on the left side.
- Add a New Form Component.
- Give the component a title
- Add a select form component.
- Select the data source created.
- Define the label visible to the users when interacting with the component (the column from the SharePoint list).
- Set the Identifier Field Name (the column used for searching the SharePoint list).

- Test the Integration
- Add the component to a form.
- Test as an end user to ensure proper functionality.
References
Updated 9 months ago
Did this page help you?